Creating Map Books Using Data Driven Pages
With the release of ArcGIS Desktop 10 comes the ability to create data driven pages. Data driven pages facilitate creation of multiple maps from a single layout. This means the layout only has to be created once. Referencing a layer in the map, data driven pages moves from one feature to the next, creating a new page for every feature. Once created, these pages can be printed or exported individually or collectively.
Believing experience is the best teacher, the rest of this post is a tutorial of how to use data driven pages. To be able to complete the tutorial, you will need a copy of ArcGIS Desktop 10 at any license level (ArcView, ArcEditor or ArcInfo). The data will be downloaded directly from ArcGIS Online as a map package. With the data in hand, you will create data driven pages, a page definition query, an extent indicator in a locator map and add dynamic text to the layout. Additionally, I am assuming familiarity with ArcGIS Desktop. As a result, details of tasks typical to using ArcGIS Desktop are not detailed. Only the unique steps of creating data driven pages are detailed.
Data Download
The first step is getting the data to work with. The data for this tutorial is saved on and can be retrieved from ArcGIS Online. Browse to ArcGIS.com and log in. If you do not already have an account, setting one up is free and does not take more than a minute.Once logged into ArcGIS.com, search for Data Driven Pages Tutorial. When I completed the search on 18 Mar 2011, this was the only result. With this located, click on the Open link below the thumbnail. The map package will download and open in ArcMap
Create Data Driven Pages
Once opened in ArcMap, take a moment to acquaint yourself with the layers in the map. There are three dynamic layers and one basemap layer. The top layer, Parcels, contains all land parcels privately owned and to be affected by the proposed easement. The Proposed Easement is represented in the bottom layer symbolized in yellow. Between these is a layer representing the intersection of parcels and the easement, Affected Areas. It contains only the areas within parcels to be affected by the easement.To create this map, data driven pages will be used to show each parcel. Affected areas will be filtered to only show the affected area in the display parcel. The locator map will depict the perimeter of the parcel and the title will include the Parcel ID number.
To start, turn on the Data Driven Pages Toolbar. This can be accomplished by clicking on the Customize menu > Toolbars > Data Driven Pages.
With this toolbar turned on, next click on the create data driven pages button on the left side of the toolbar.
This will bring up the dialog to create data driven pages. In this dialog, first specify the data frame to pan from one location to another to highlight each feature. In this map, the Detail data frame will be the data frame used to pan from one location to the next. Select this as the data frame. Next, select the features to be iterated through for the creation of pages. Specify Parcels as the layer to be used. After this, specify the field in the attribute table to be used as the name for each page. Use PID as the name field. Finally, specify the field used to sort the pages. I almost always make this the same as the name field. Thus, specify PID for this field as well. Click OK and ArcMap will create all of your data driven pages.
Now data driven pages are set up. On the Data Driven Pages toolbar, the forward and back buttons can be used to iterate through the parcels to view the different pages. Next, we will explore additional functionality complimenting data driven pages, a page definition query, an extent indicator and dynamic text.
Page Definition Query
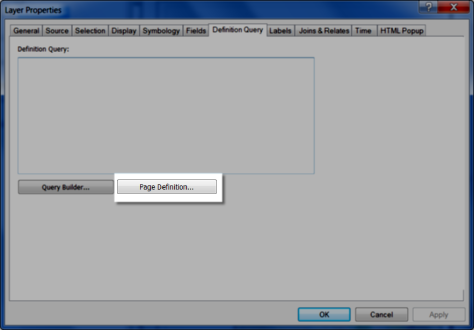
With data driven pages set up, any layer other than the one used to set up data driven pages can be filtered based on the field used to set up data driven pages. In our case, we cannot filter the Parcels layer. This is the one used to set up data driven pages. Data driven pages was set up using the PID field. The Affected Areas layer has a PID field matching the Parcels layer. As a result Affected Areas can be filtered to show only the affected area for the highlighted parcel. This is set up using a new button added to the Definition Query Tab of the layer properties dialog.To begin, open the properties for the layer to be filtered, Affected Areas. In the properties dialog, select the Data Driven Pages tab. In the Data Driven Pages tab, locate the Page Definition button and click it to open the Page Definition dialog.
In the page definition query dialog box, we are interested in showing the affected area matching the parcel. To accomplish this, first check the box to enable data driven pages. Next, ensure PID is the Page Name Field. Finally, select the radio button to show features that Match. This means we will be showing the features matching the PID of the Parcel in focus for data driven pages.
If you take a moment to view your handiwork thus far, in addition to data driven pages, only the affected area of the focused parcel is shown in the map. There are still a couple of things missing though. The locator map still is not telling us much. It needs an extent indicator. Also, there is no title.
Extent Indicator
The extent indicator is a property of the data frame we want to contain the extent indicator. In the properties of this data frame, we tell it which other data frame we want to show the location of.To get started, open the properties of the data frame to contain the extent indicator, the Locator data frame. In the data frame properties dialog, select the Extent Indicators tab. With this active, select the data frame to show the location of, in our case Details. Commit this selection by moving it from the left to the right column using the ">" button. Apply and close the dialog by clicking OK.
Most of the functionality offered by data driven pages we have now taken advantage of. We have created a map book using data driven pages, filtered features using a page definition query and are showing the location of the highlighted feature using an extent indicator in a locator map. Still a title is missing. To create this, we are going to use dynamic text.
Dynamic Text
Finally, to place a relevant title at the top, we are going to use dynamic text to display the PID field as part of the title for the map layout. This way each page will have its own unique title in the map book containing the parcel identification number. First we will insert the dynamic text and then customize it to make a little more sense as a title.To insert dynamic text identifying the Parcel ID, from the data driven pages toolbar select Page Text > Data Driven Page Name. Once on the page, move the text to the top of the page and set the properties to be more like a title. For my layout, I enlarged the text and made it bold.
All we have at the top of the page is an eight digit number. This does not tell anybody much who is not familiar with what we are trying to accomplish. To make the map a little more readable, we will add a little static text to this layout annotation in the properties of the annotation.
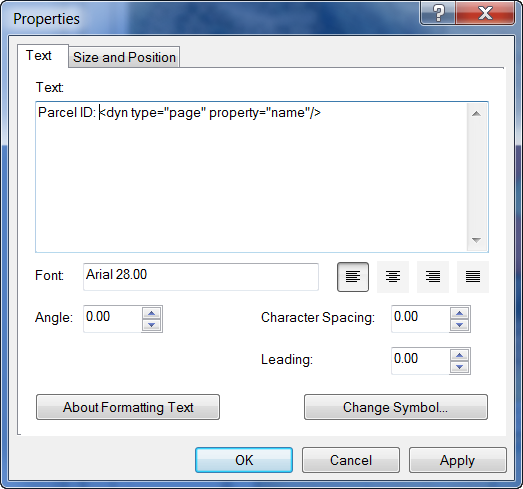
To do this, right click on the text and select Properties from the context menu. In the properties dialog under the text tab in the Text entry area, right now there is only a little xml markup identifying the dynamic text to be entered in the field. This places the PID in the title. In front of this xml, identify what the number is for somebody looking at this map. Type "Parcel ID: " in front of the xml to accomplish this. The field is very literal. Ensure a space is included following the colon. This way there will be a space between the colon and the parcel ID number.
Once completed, you have created a map book using data driven pages complete with a page definition query to focus on specific features, an extent indicator in a locator map to show the location of the highlighted feature and dynamic text to add information to the layout for each page. Please feel free to comment if there are omissions to this tutorial or something is not working. Hopefully this makes data driven pages a little easier to use. Also, all of this functionality is documented in the installed and online help. Here are the links to the online help pages:
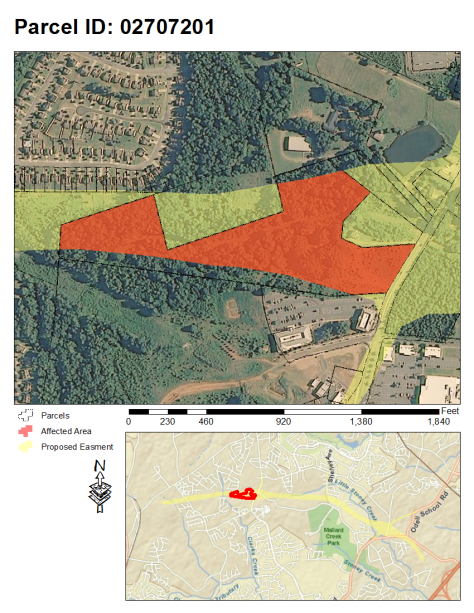
Finally, here is an export from the completed product used for writing this tutorial. I will apologize in advance for the pixelation. The image was down sampled quite a bit to keep the file size small.


