Run ArcGIS Models as Scheduled Tasks
ModelBuilder in ArcGIS Desktop is great. It enables the functionality of scripting without needing to know scripting. If you know how to use tools in ArcToolbox, typically in less than 30 minutes you can start automating redundant and long multi-step workflows using ModelBuilder. When it comes to taking this automation one step further, to have the computer automatically perform this workflow at a scheduled time, this is where difficulty can arise.
Windows cannot run a model as a scheduled task. Windows can however, run a Python script as a scheduled task. A Python script can run a model as a scheduled task. Using a three line Python script, a model can effectively be run as a scheduled task. The scheduled task calls the Python script and the Python script calls the model. The script looks like this...
import arcpy
arcpy.ImportToolbox(r"C:pathToToolboxToolbox.tbx", "TBX")
arcpy.Model_TBX()
The steps to get this working are to build the model, configure the Python script to call the model and finally set up a scheduled task to call the Python script. The first step, building the model, is beyond the scope of this quick tutorial. If you have never seen ModelBuilder before, there is a pretty healthy section in ArcGIS Desktop help discussing ModelBuilder.
Configure the Script
Next, with the model built and saved in a custom toolbox, the next step is to configure the Python script to call the model. Looking at these three lines of code, there are two things to configure, the path to the toolbox and the name of the model.Locate the second line of code calling the ImportToolbox method.
arcpy.ImportToolbox(r"C:pathToToolboxToolbox.tbx", "TBX")
Replace the path between the double quotes with the path to and name of your custom toolbox. Leave the r in front of the path. This tells Python to literally interpret the following string. Since Python recognizes certain characters as having special purposes, this helps to ensure any backslashes in your path are not interpreted by Python to have a special purpose.
Next locate the third line of code calling the model from the custom toolbox.
arcpy.Model_TBX()
Literally replace the word Model with the name of your model. Leave the _TBX() on the end. This references the module name. A more in-depth discussion of this can be found in the help for the ImportToolbox method.
Create a Scheduled Task
With the model created and the script configured, the last step is to schedule a task in Windows to call the script. Help on creating a scheduled task in Vista or Windows 7 can be found here. If using XP, the help documentation can be found here. Although very similar, the location to find the exact tools is somewhat different between Windows versions. Given my machine is Windows 7, this is the workflow outlined below and where the screenshots obviously came from.Scheduling a task is relatively straightforward. Locate the task scheduler in the control panel and configure it. Begin by going to the Start menu and selecting the Control Panel. In the Control Panel, open Administrative Tools. Locate and open the Task Scheduler from Administrative Tools.
With the Task Scheduler open, a basic task will open and run the script calling the model. Under Actions on the right side, click on Create Basic Task.
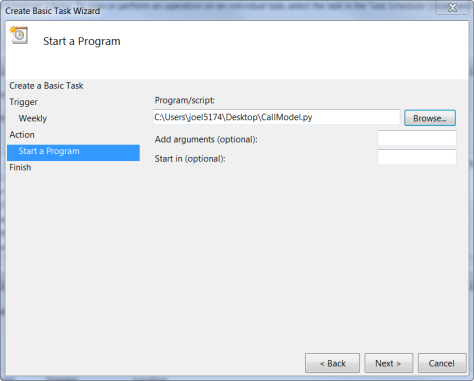
Using the steps in the wizard, set the properties, interval and time to run, and point to the script.
Now, by using a simple Python script, ArcGIS models can be run as scheduled tasks. In this way the workflow can be maintained as a model while still accessing the convenience of running repetitive and time consuming tasks unattended, thereby saving time.


