Get SafeGraph Patterns by POI ID Using an AWS EC2 Instance

Retrieve SafeGraph Patterns Data for Only Specific Points-of-Interest(POI) Using an Amazon Web Services Elastic Compute Cloud Instance
"What the heck did he just say?" Yes, even for a large proportion of the technical people who visit my blog, this very well may sound like gibberish. Further, even for those who know what it means, you are still asking, "Why go to all the trouble?"
What?
SafeGraph data is aggregated human movement data - cell phone tracking data aggregated to protect personally-identifiable-information (PII), reduce the size to be somewhat manageable, and provide valuable insights for understanding where people are coming from, and what locations are being visited. While SafeGraph provides a number of human movement data products, one I have been working with a decent amount recently is called Patterns. If only interested in the last few months, SafeGraph provides data access through a very intuitive browser based interface called the data bar.
If however, you are interested in understanding pre and post Covid trends, you need to get data going further back. This data is summarized by month and available as national datasets through Amazon S3 buckets. Each month's Patterns data is stored as a series of comma separated (CSV) files compressed using G-Zip (GZ) compression and split based on the size of the data for the month. Typically each month is a series of three to file files.
Patterns is based around the idea of Places of Interest (POIs), locations curated by SafeGraph where people congregate. While primarially business, these POIs include public recreation facilities such as parks, musems and campgrounds as well. This happens to be one interesting use I have been exploring lately, helping government agencies to understand how public park usage is changing due to Covid.
SafeGraph Patterns data provides a count of device nighttime locations by block group (with considerations for protecting PII) visiting each POI. Because Esri provides a mountain of demographic data describing exactly who people are by block group, Esri Tapestry Segmentation, combing SafeGraph Patterns with Esri demographic data provides a very rich picture of park patron behaviors based on who is visiting and where they are coming from - rich geographic context.
The first step, though, is getting the data.
Why AWS EC2?
The data is big, and moving data out of Amazon Web Services (AWS) can be costly. If the data is processed within AWS, this dramatically reduces the time required to process, and also reduces the size of the data being downloaded, also dramatically reducing the cost incurred on SafeGraph. Since working primarially with pre-sales engagements partnering with SafeGraph, this is a consideration for my work, not incurring undue costs for exploring a proof-of-concept (POC).
SafeGraph patterns data is big. True, it is not ginormous. It is not trillions of records big, but it is still big enough to where it takes time to download, space to store, and compute to process what you typically need for analysis. Once filtered to the relevant POIs being studied, the data is quite managable.
This data resides in Amazon S3, but SafeGraph wisely does not have S3 Select enabed as this incurs costs. Consequently, getting the required data requires iteratively retrieving each file, filtering it to just the needed records, and compiling the result. Since each Patterns file is a CSV GZipped file, this also requires unpacking the archive. Further, SafeGraph has current data and archived data in different directories.
While none of this is exorbitantly difficult to navigate and perform after a little investigation, I firmly believe in working harder and smarter to be lazy later (or efficient, however you want to look at it). To this end, I pulled together the workflow after the first time around into a project repository on GitHub with most of the hard stuff moved into a Python package. This siginifcantly reduces the complexity and increases the reproducability of working with this data with ArcGIS.
Now, the data procurement step, getting only the data associated with POIs being studied, can now be as little as three lines of Python. Still, the actual process of downloading and selecting the data is incredibly slow due to challenges of data gravity.
The term “data gravity” is a metaphor coined by software engineer Dave McCrory in 2010. He was trying to convey the idea that large masses of data exert a form of gravitational pull within IT systems...While data doesn’t literally exert a gravitational pull, McCrory used the concept to explain why smaller applications and other bodies of data seemed to gather around larger masses. More importantly, as applications and the datasets associated with them grow larger, they become more difficult to move.
-VXCnge.com
Rather than downloading the data to extract only what is needed, by using an Amazon EC2 we can take this data extraction step to the data enabling us to only download the data needed.
How to Do It
The general overview is...
- Create a Security Group for network rules
- Start up an Amazon EC2 instance running Ubuntu
- Connect via SSH
- Install
make - Clone the GitHub Repo
- Configure the instance using
make ec2 - Setup the
.envfile - Run Jupyter using TMux
- Run the data procurement (EC2) notebook
- BONUS: Save the image as an Amazon Machine Image (AMI)
It sounds like a lot, but once you run through it once, it really is not altogether difficult. I had to do this about three times today, and it, on average, took me about eight minutes to have a running notebook pulling data. You have waited longer for a lattè. Do not be afraid.
The easiest way to get started is just to log into the AWS Management Console and click on EC2.

Create a Security Group
You'll only have to do this step once. Once you've created a security group with the right rules, you can simply reuse it.
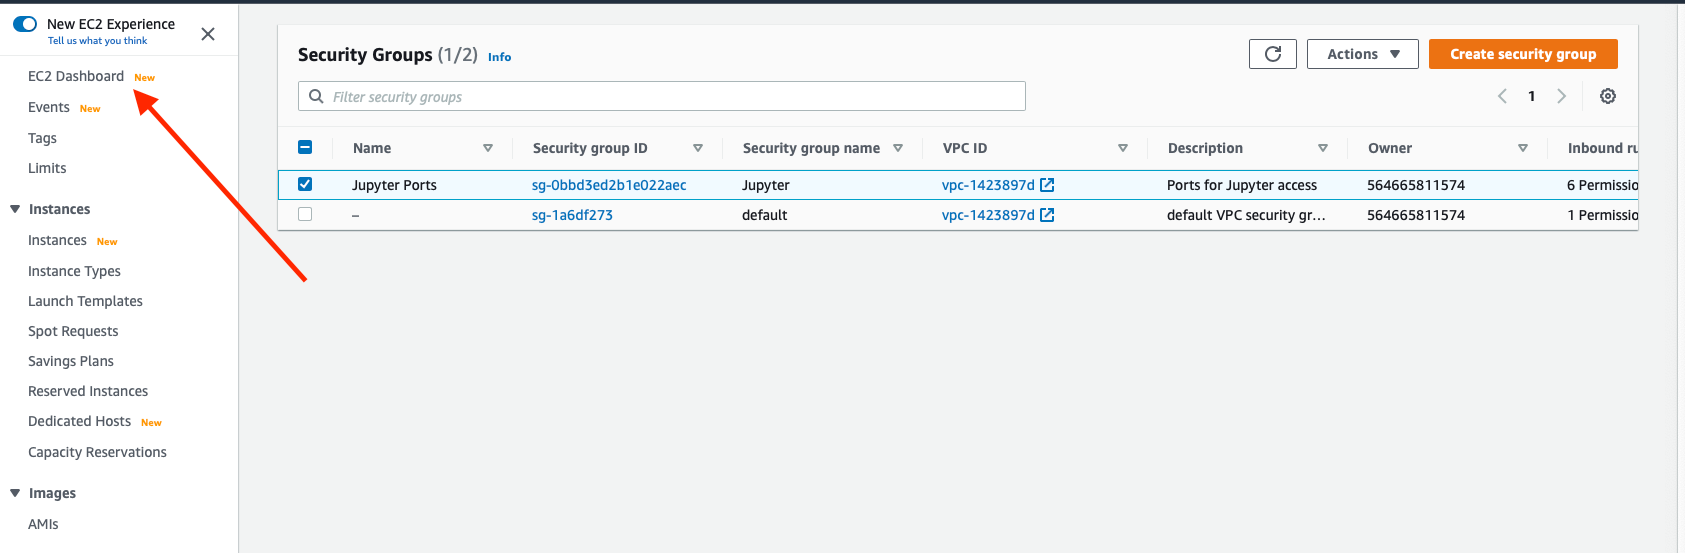
Along the left side, click on Security Groups.
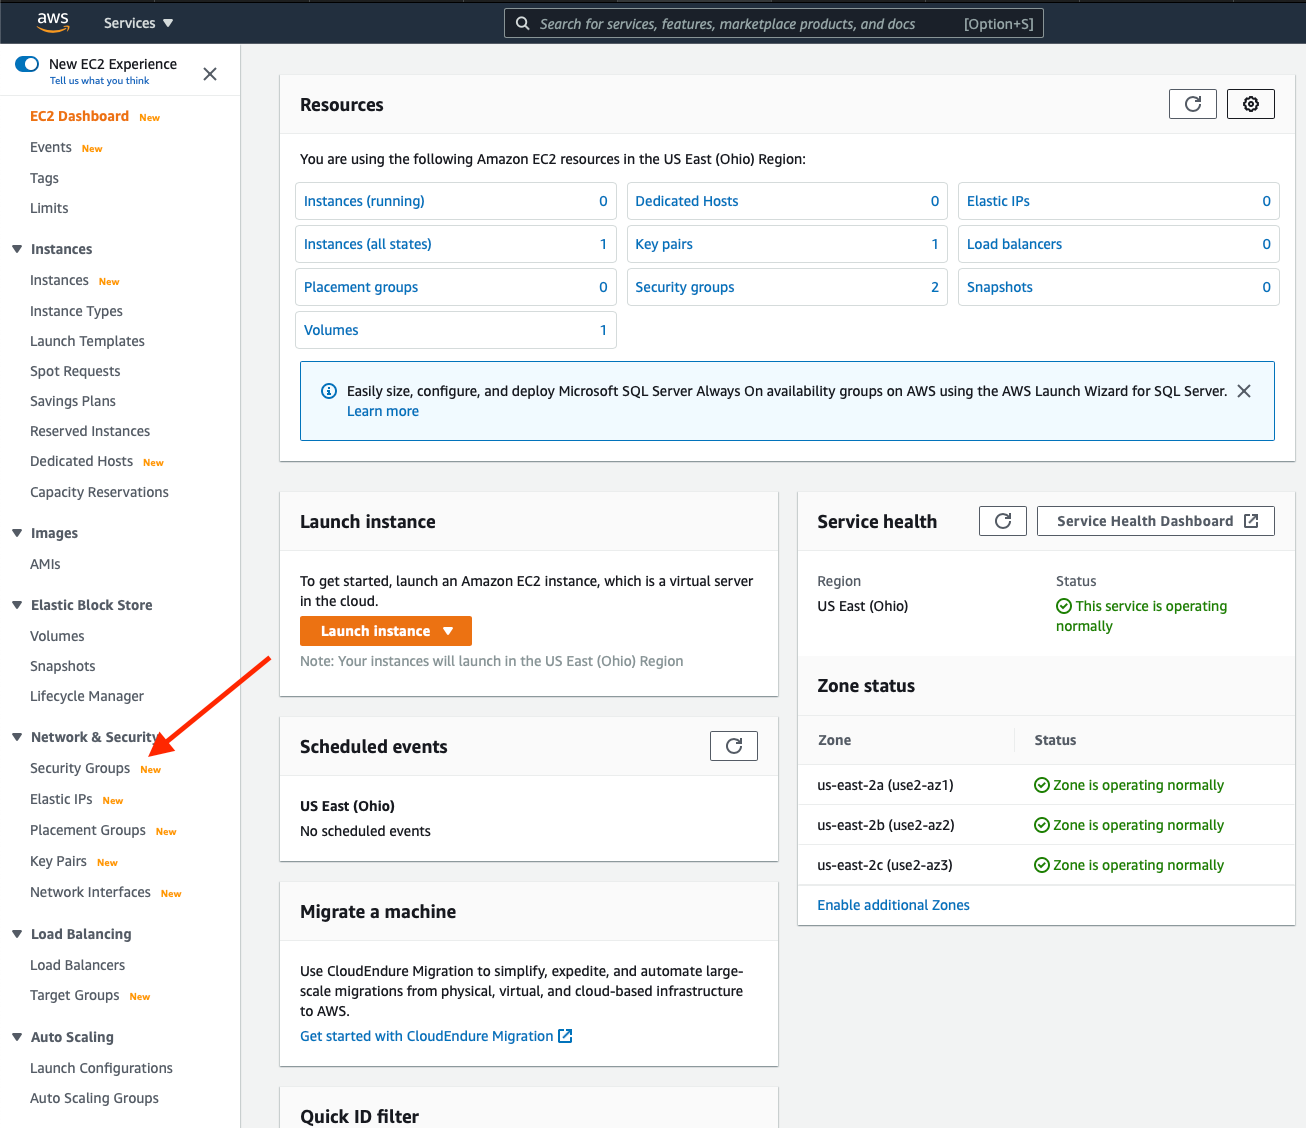
Next, click the Create security group button.

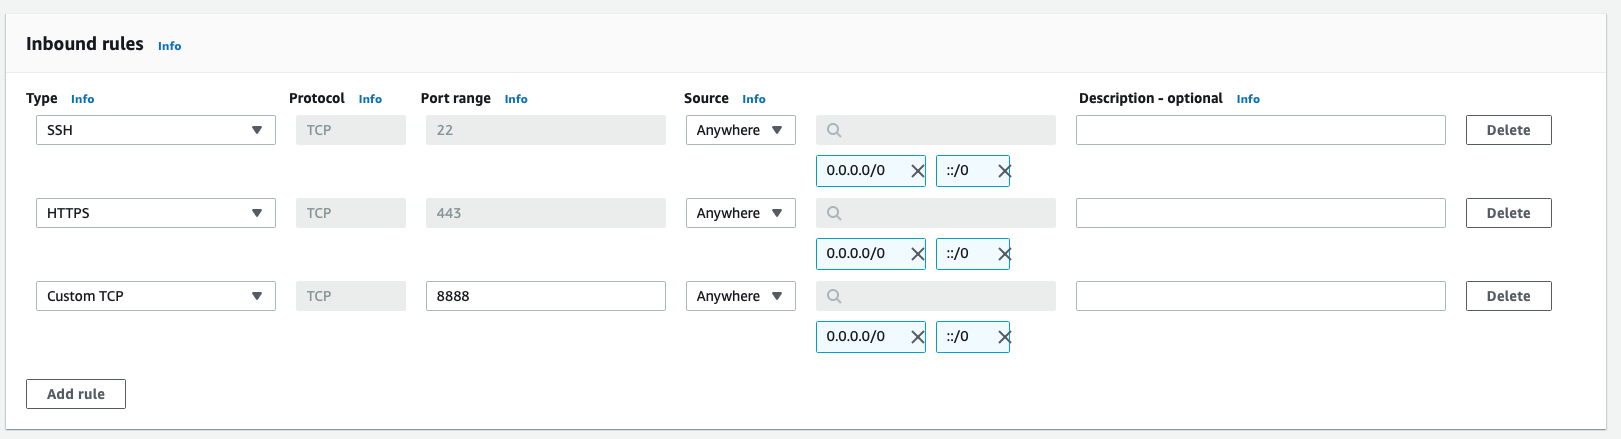
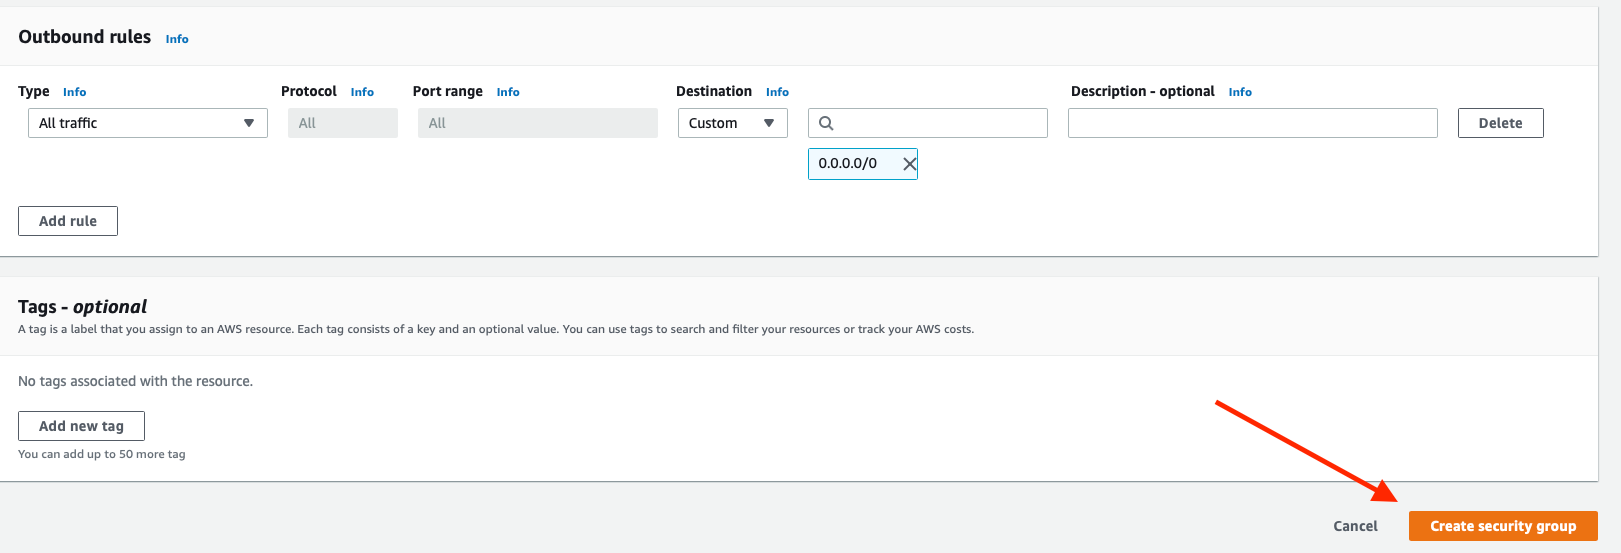
Give the security group a name, description and select a VPC (I just have one, so pretty easy). Now, add inbound rules for SSH, HTTPS...
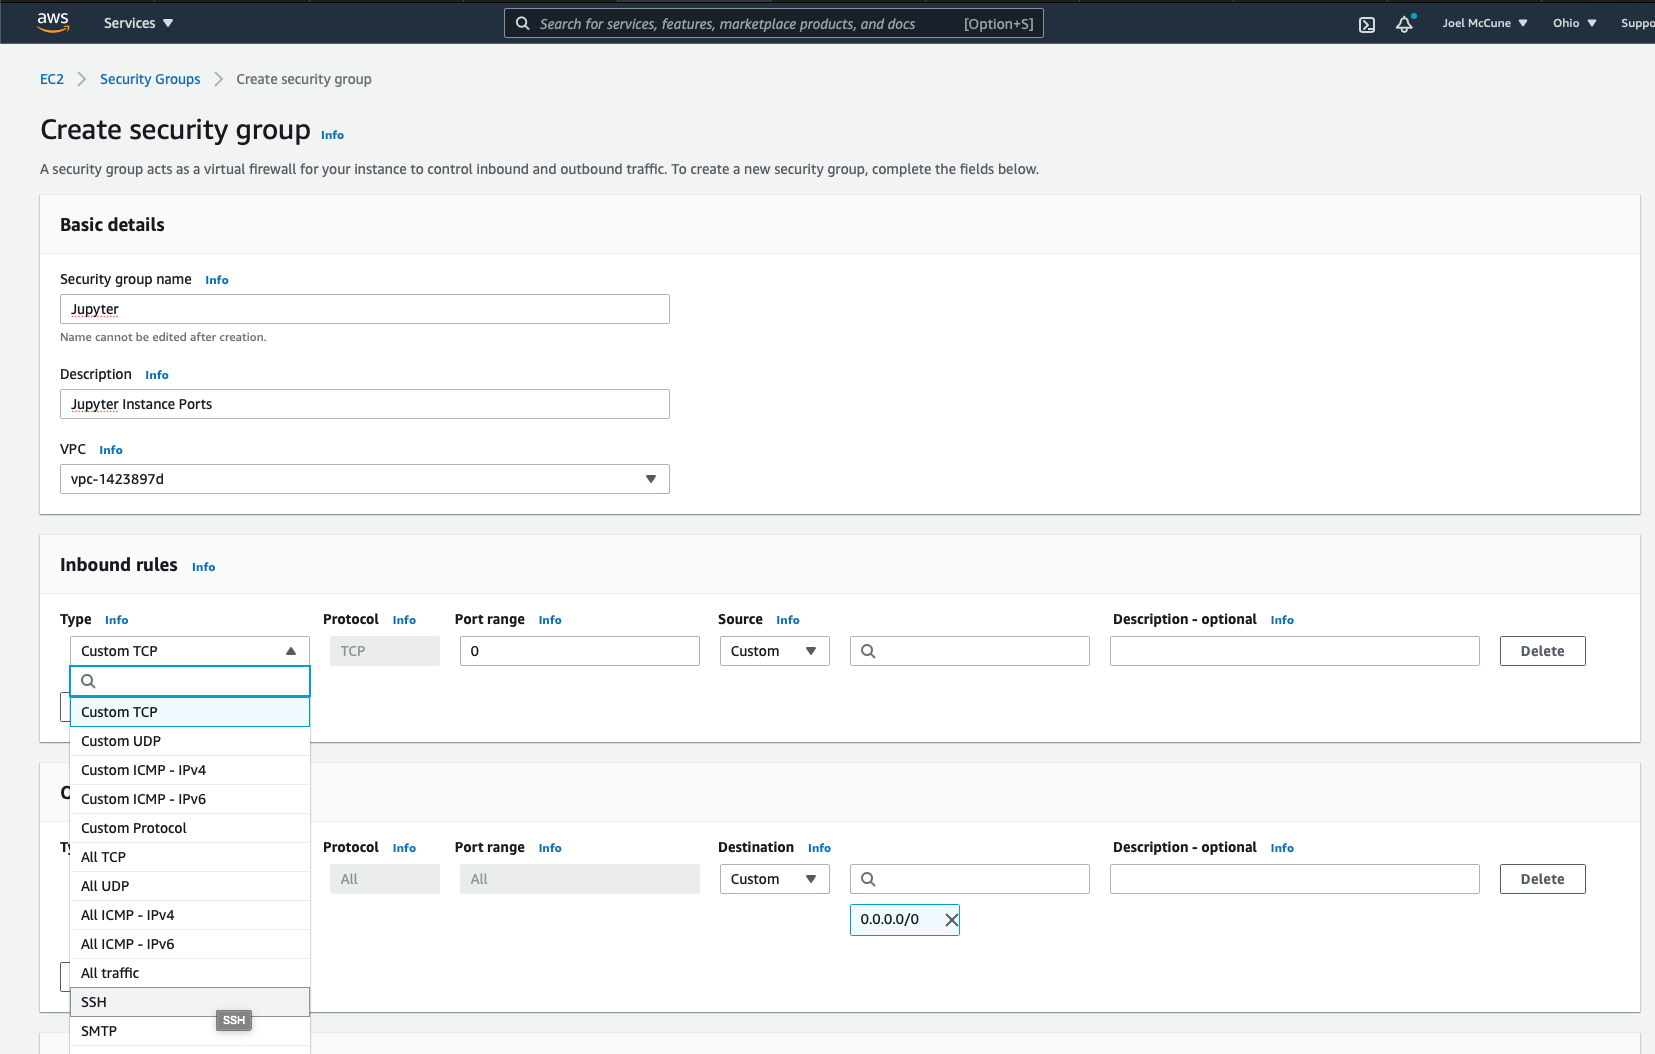
...and a custom rule for port 8888, the port Jupyter runs on.
From there, simply scroll to the bottom and click Create security group.
Create EC2 Instance
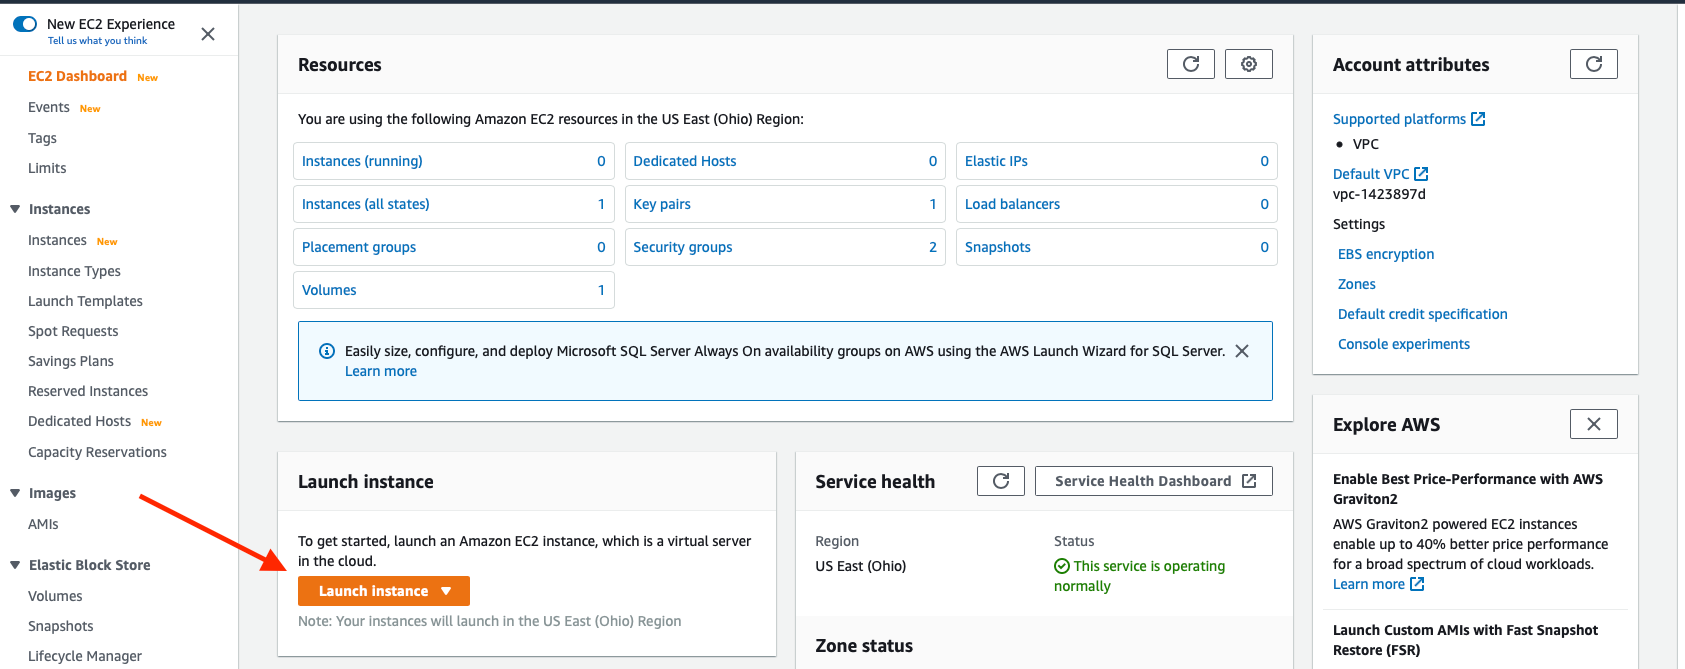
Now, we get to create an instance to work with. Return to the main EC2 Dashboard...
...and click on Launch instance.
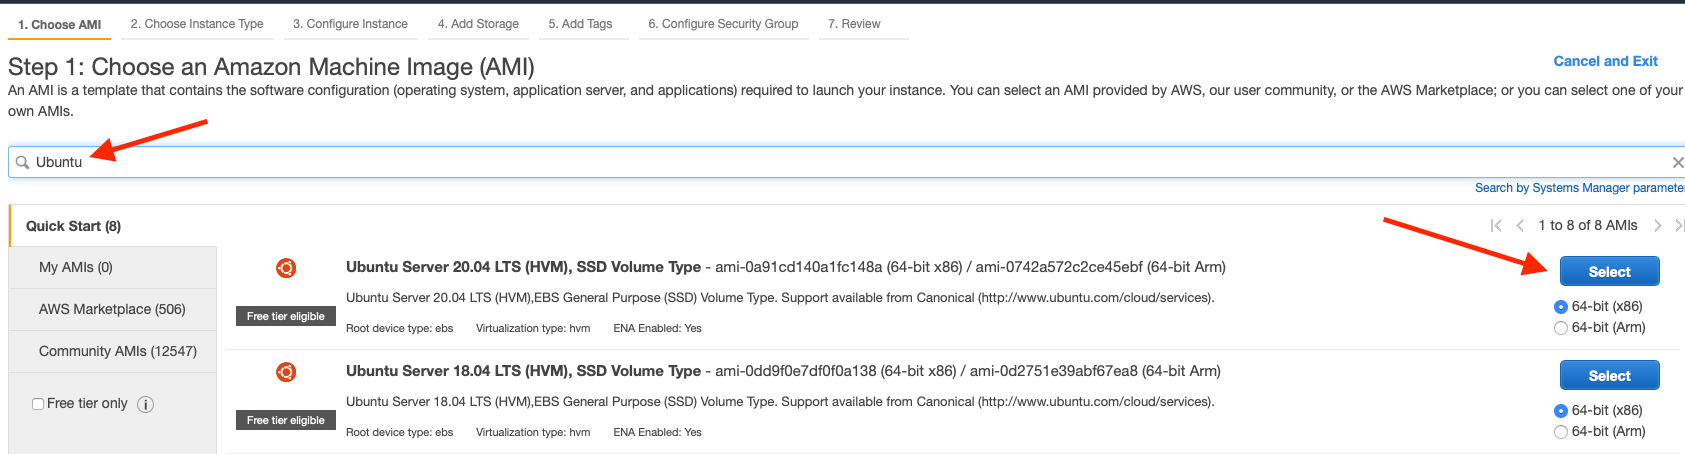
Search for Ubuntu and Select the Server. For what we are doing any Ubuntu Server will work.
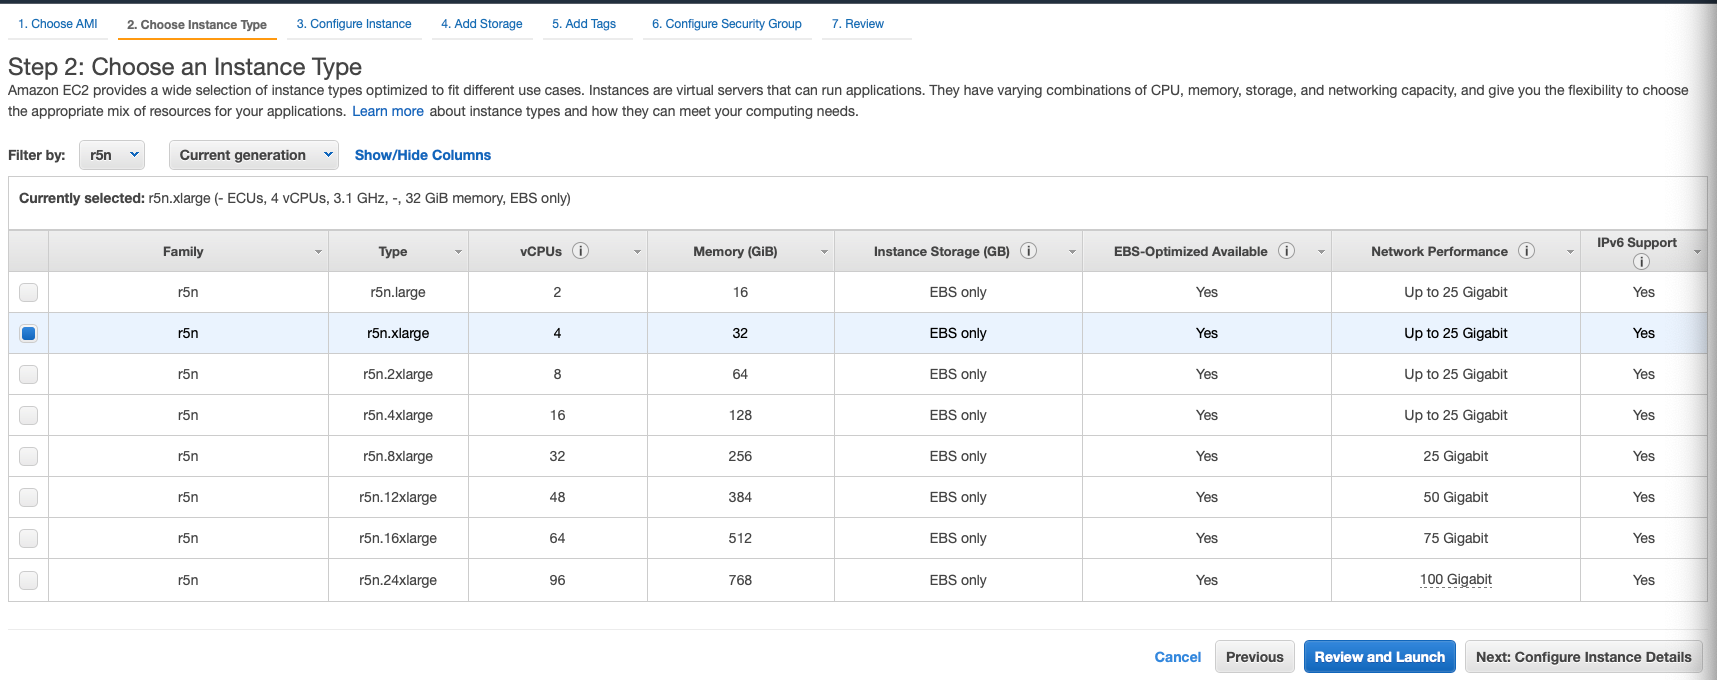
The next screen is where we have to find the right hardware for the task at hand. The SafeGraph data processing workflow I built keeps all the data in memory, so this instance needs a decent amount of memory. However, I have not yet figured out how to multithread it, so we do not need a lot of processing cores. Therefore, we need to find an instance with a decent amount of memory with less emphasis on processing cores.
I discovered the r5n.xlarge worked well. When I wrote this, it is just under $0.35 per hour, so if you work all the way through this, and shut it down, you might be out all of $2.00, enough to pay the paper boy in Better Off Dead.
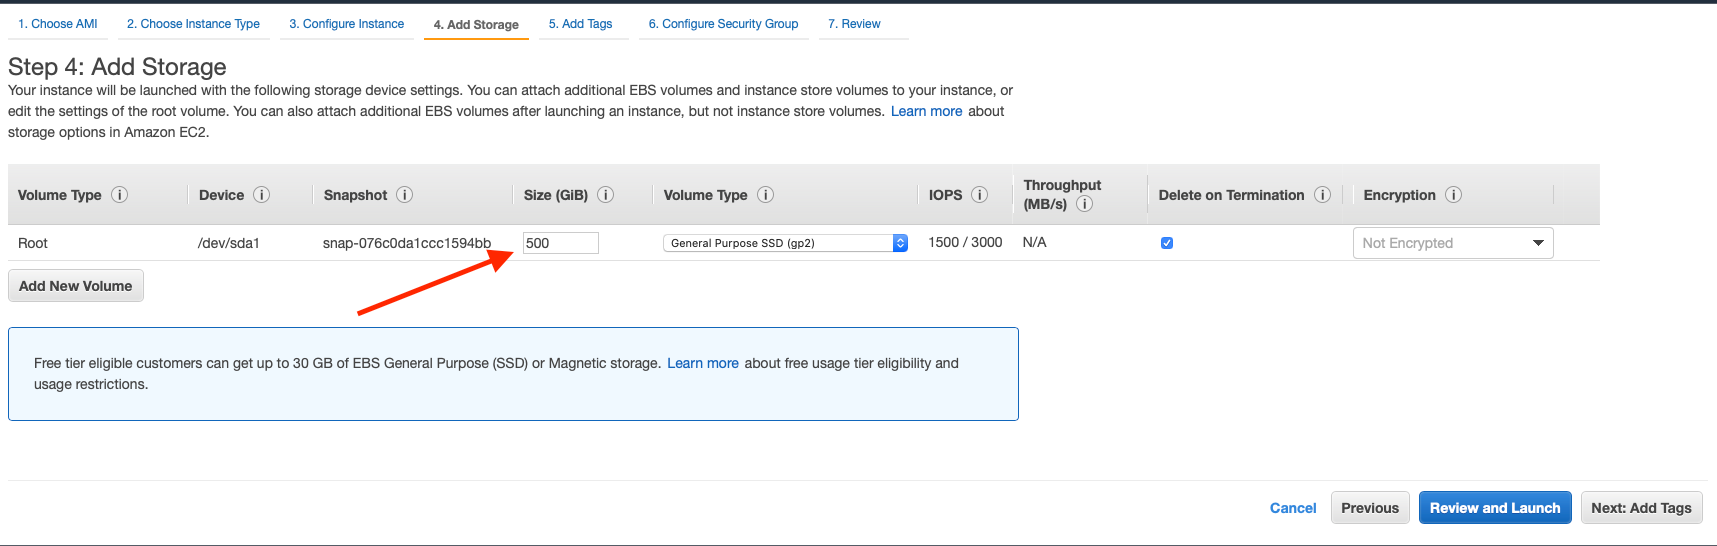
Continue through to the next prompts to Step4: Add Storage. We are cloning a repo, and moving some data around, so we need some storage capacity. I gave myself enough to work with, 500GB, since I am going to delete all these resources after getting what I need.
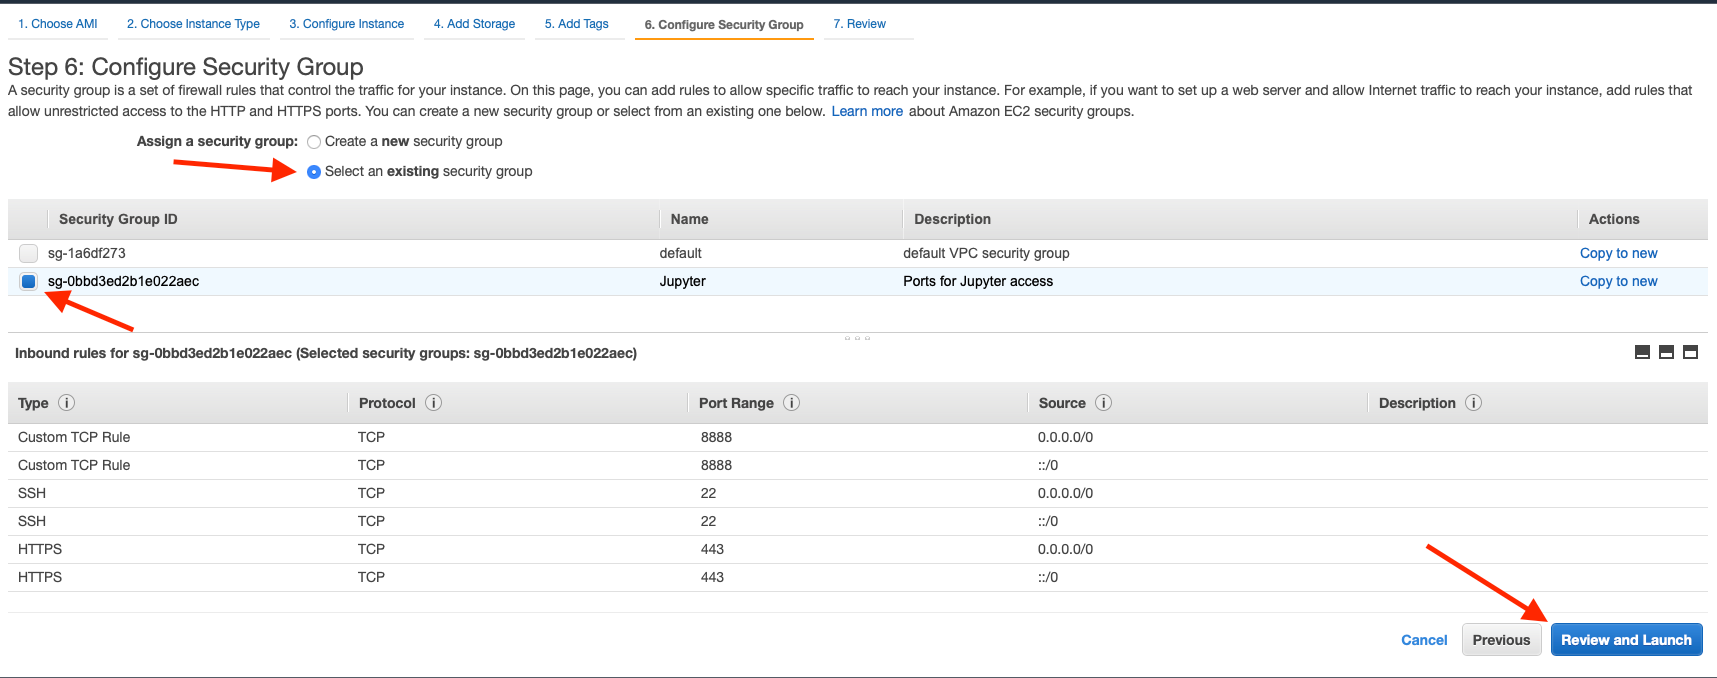
Finally, take advantage of the security group you created. Select an existing security group, select the security group created in the earlier step, and click Review and Launch.
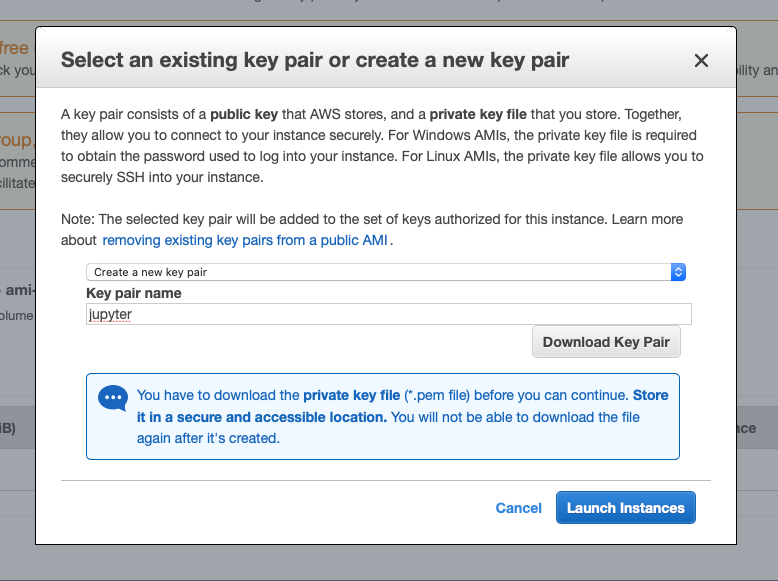
From the next pane, click on Launch. A modal window will appear. In this window create a new key pair, give it a name, and download it. You will use this to connect to your instance if using a standalone SSH client. Once you have downloaded the PEM file, you can then Launch Instances.
In the next window, click on View Instances. Congratulations, you just launched an intance, effectively a computer, in the cloud.
Connect via SSH
Now, we need to get some stuff set up on this new instance. To do this, we need to get connected first. You can use an SSH client, or you can just use the built in console. Amazon makes it relatively easy to do both.
First, select the instance you just started, and click on Connect.

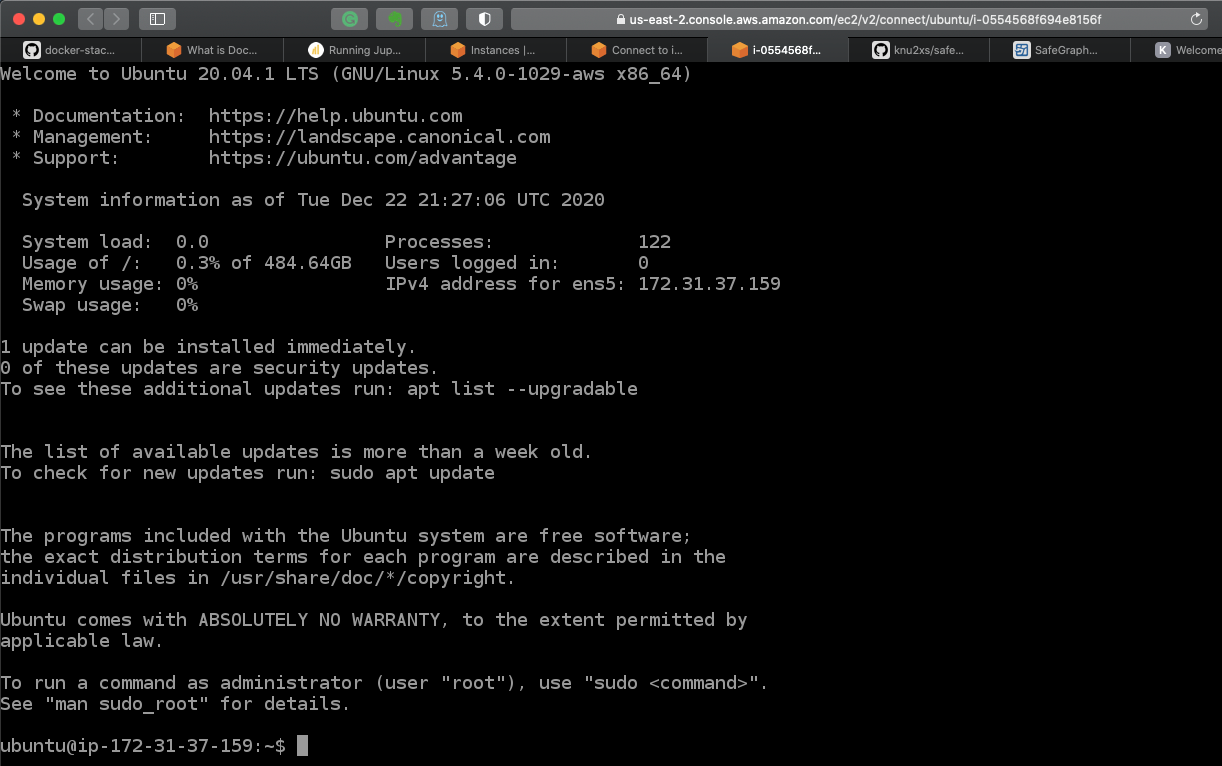
If you just want to use the browser terminal client provided by Amazon, you can just use the first option, EC2 Instance Connect.
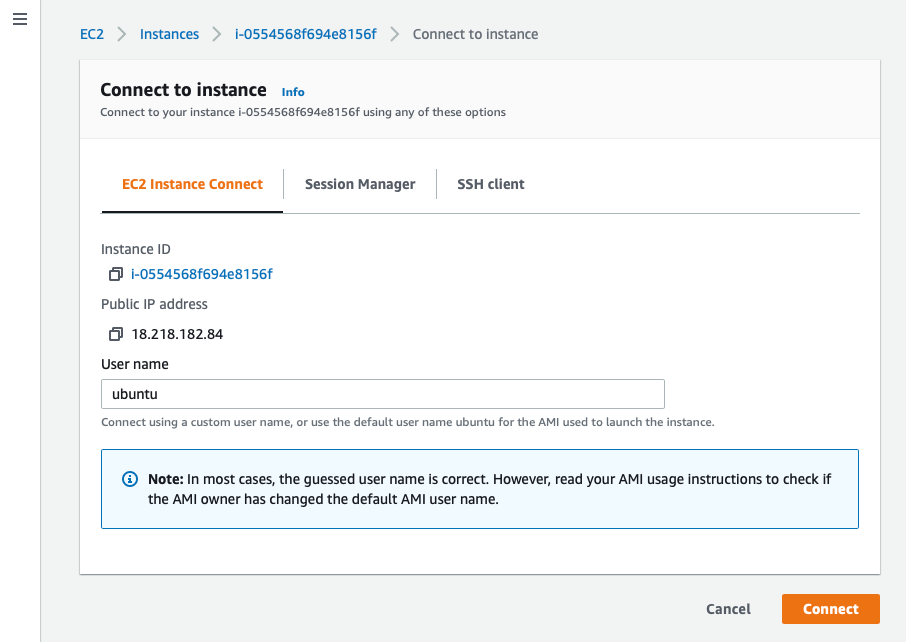
This will open a console right in another browser tab.
Myself, I prefer to use iTerm on my Mac, so I opt for the SSH client. Amazon makes this easy with a snippet esaily copied by clicking on the icon to the left of the full command line snippet.
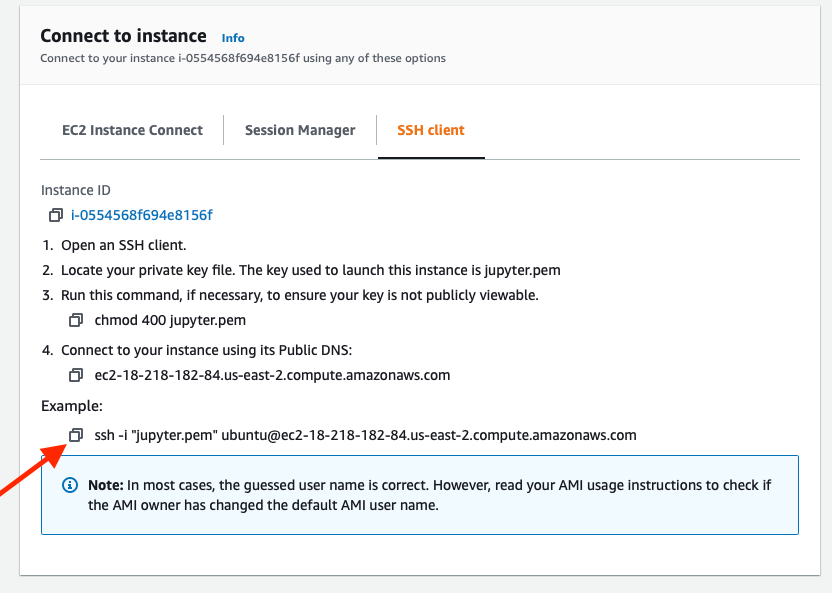
After navigating to the directory where the PEM file is located, cd ~/Documents, getting connected via SSH to the session is as simple as pasting the snippet copied above.
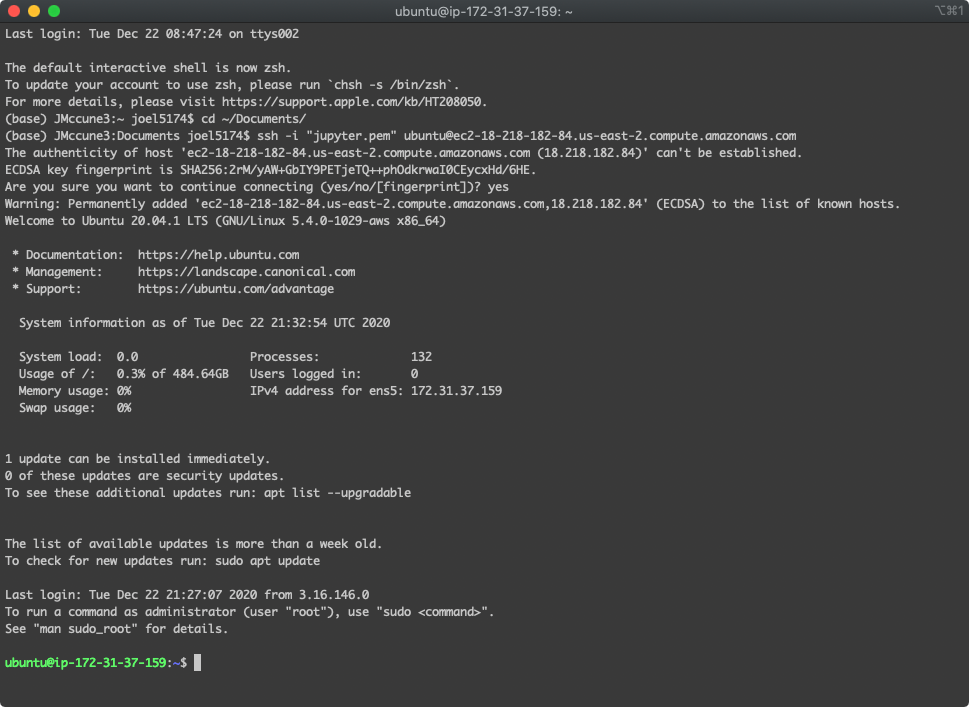
Now, we're connected and can get to work configuring the instance.
Install make
We are going to need a command line application called Make to run the commands in the Makefile streamlining a lot of the setup process. Install Make by entering the following into the command line.
$ sudo apt-get install makeClone the GitHub Repo
Now, get the resources for working with SafeGraph data using the command...
$ git clone https://github.com/knu2xs/safegraph-data-utilities.gitThis will create a directory in the current working directory, the user home directory, to work in. Switch into it.
$ cd ./safegraph-data-utilitiesConfigure the Instance using make ec2
Part of the resources you just downloaded in the referenced repo include Makefile. There is a block in this Makefile, the ec2 block you can run. This will take care of installing miniconda, setting up a new conda environment called sg-data with all the requirements, and also configuring the instance so you can log into Jupyter from your local computer's browser. It takes about five minutes or so. Once finished, you are ready to start getting to work.
Setup the .env File
One thing you are going to have to set up manually is the .env file. This file is not in the Git repo. It is deliberatly excluded since it contains the credentials to both access ArcGIS Online and the SafeGraph S3 bucket where the data resides. It is not difficult to create. You can do it right from the command line using a text editor called Nano.
From the SSH command line you have been working in, create the file and open it in nano by typing the following.
$ touch ~/safegraph-data-utilities/.etc

$ nano ~/safegraph-data-utilities/.etc
The file does not contain a lot. You can use the following as a template.
ESRI_GIS_URL=https://myorg.maps.arcgis.com
ESRI_GIS_USERNAME=username
ESRI_GIS_PASSWORD=p@$$w0rd

AWS_KEY=AWS456KEY
AWS_SECRET=EvEnL0ng3rS3cr3t
You can retrieve the AWS_KEY and AWS_SECRET from the SafeGraph Data Catalog.
Now, with this all set up, you are ready to get to work.
Run Jupyter using TMux
From here, if you want to leave the SSH session open while you work, you don't have to use Tmux, terminal multiplexer, but I prefer to be able to start the Jupyter server and disconnect without loosing my session in the browser. Tmux enables you to do this.
$ tmux
Now, your terminal session looks a little different.
Begin by activating our new Conda environment.
$ conda activate sg-data
You can now start up Jupyter Lab (the only way to work).
$ jupyter lab --no-browser
From here, if you want to exit to the SSH session, you can by hitting Ctrl+B and then D. A more complete list of Tmux commands can be found in this cheatsheet.
Finally, this is the fun part, where we can start playing around. Find the url of your running instance back on the instance details AWS Dashboard. Copy the public url.
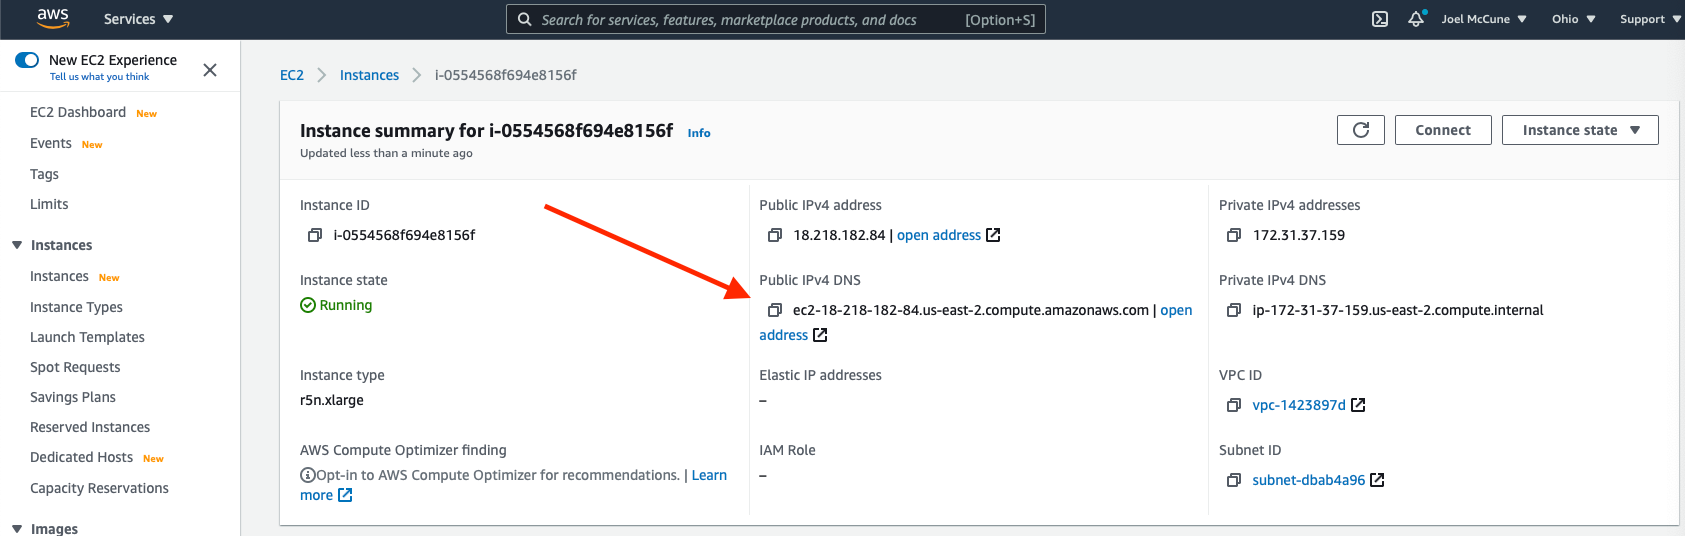
Paste this url into your browser and append port 8888 onto the end of the pasted url. In the instance of the example I used above, the url becomes.
http://ec2-18-218-182-84.us-east-2.compute.amazonaws.com:8888
You're presented with a rather boring page with a password prompt. The script set this up automatically as jovyan.

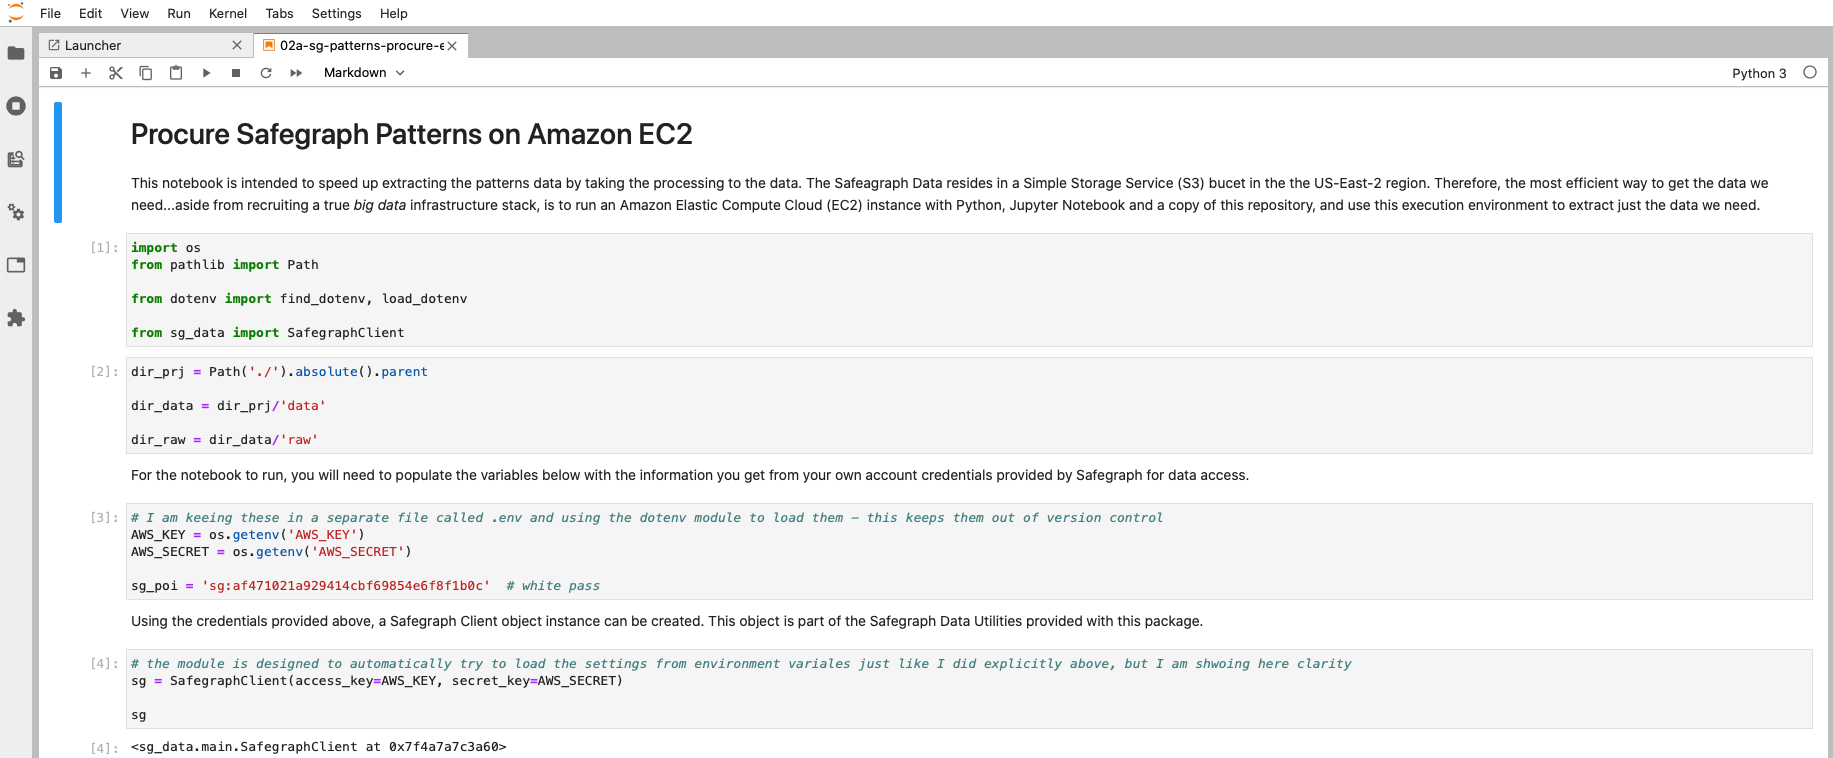
Once in, the notebook you are looking for is ./notebooks/02a-sg-patterns-procure-ec2.ipynb. However, this post is already way too long, so I'll save that for a part duex. There's nothing like a good sequel, right?