Set Up PyScripter to Create ArcGIS Python Toolboxes
For the last year or so, my Python IDE of choice has been PyScripter. Recently I have started to create ArcGIS Python Toolboxes. PyScripter is still my editor of choice for this task...with a bit of customization. This requires two steps, adding the unique file extension (pyt) to the list of recognized Python files and adding another template for quickly getting started creating new Python toolboxes.
Add Python Toolbox Extension to Recognized File Types
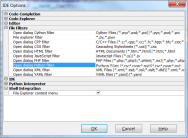
First, PyScripter will not allow saving a Python file with the pyt extension. Nor will it recognize and automatically provide code syntax highlighting. Fortunately, it is not very difficult to include pyt as a recognized file extension so files can be saved and syntax highlighting will automatically work. In PyScripter go to Tools > Options > IDE Options. The IDE Options dialog is organized into collapsable sections. The fourth section, File Filters, is what we are looking for. In the File Filters section, locate Open dialog Python filter. Click on the text to the right of Open dialog Python filter and it will become editable.This is a short string with two sections separated by a pipe symbol. The first section to the left of the pipe is what you see in the file Save or Save As dialog. The second section to the right of the pipe is used by PyScripter to recognize files based on their extension for execution during debugging and syntax highlighting. In our case the default looks like this.
Python Files (*.py;*.pyw)|*.py;*.pyw
In both sections, before and after the pipe, we need to add one more, the Python toolbox (pyt) extension. File extensions should be separated with a semicolon and start with an aserix. Thus, adding the pyt extension to both sections makes our new string look like this.
Python Files (*.py;*.pyw;*.pyt)|*.py;*.pyw;*.pyt
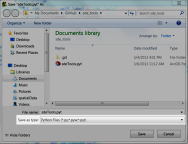
Now, files can be saved as Python toolboxes and PyScripter will automatically recognize Python toolboxes. When opened, PyScripter will know what they are and syntax highlighting will automatically work. Additionally, when saving files, the pyt extension will be an option for Python filles.
Add New File Template for Python Toolboxes
PyScripter makes new file creation easy and fast with new file templates. These are completely customizable. We can add one for new Python toolboxes to make life a little easier when starting a new project.The ArcGIS help documentation includes a Python toolbox template to make getting started a little easier. This is a good start for the code, but I like to take it a step further, adding my own comments at the top. PyScripter's editing dialog is a little small, so you may want to copy the template from the help documentation into a text editor (like PyScripter) and add everything you want. For instance, this is what my completed template looks like.
'''
Name:        |
Purpose:

Author:      Joel McCune

Created:     $[DateTime-'DDMMMYYYY'-DateFormat]
Copyright:   (c) Joel McCune $[DateTime-'YYYY'-DateFormat]
Licence:
    This program is free software: you can redistribute it and/or modify
    it under the terms of the GNU General Public License as published by
    the Free Software Foundation, either version 3 of the License, or
    (at your option) any later version.

    This program is distributed in the hope that it will be useful,
    but WITHOUT ANY WARRANTY; without even the implied warranty of
    MERCHANTABILITY or FITNESS FOR A PARTICULAR PURPOSE.  See the
    GNU General Public License for more details.

    The GNU General Public License can be found at
    <http://www.gnu.org/licenses>.
'''

# import modules
import arcpy

'''Do not change the name of this class. It will break the toolbox.'''
class Toolbox(object):
    def __init__(self):
        '''Define toolbox properties (the toolbox anme is the .pyt filename).'''
        self.label = "Toolbox"
        self.alias = ""

        # List of tool classes associated with this toolbox
        self.tools = [Tool]

class Tool(object):
    def __init__(self):
        '''Define the tool (tool name is the class name).'''
        self.label = "Tool"
        self.description = ""
        self.canRunInBackground = False

    def getParameterInfo(self):
        '''parameter definitions for GUI'''
        params = None
        return params

    def isLicensed(self):
        '''Set whether tool is licensed to execute.'''
        return True

    def updateParameters(self, parameters):
        '''Modify the values and properties of parameters before internal
        validation is performed.  This method is called whenever a parameter
        has been changed.'''
        return

    def updateMessages(self, parameters):
        '''Modify the messages created by internal validation for each tool
        parameter.  This method is called after internal validation.'''
        return

    def execute(self, parameters, messages):
        '''The source code of the tool.'''
        return
Two things are useful in the above sample. The dates and the pipe symbol. Both the created data and copyright are set up to autocomplete the date. Thus, the template will look like this:
Created:     $[DateTime-'DDMMMYYYY'-DateFormat]
Copyright:   (c) Joel McCune $[DateTime-'YYYY'-DateFormat]
...but the resulting file will have the dates populated like this:
Created:     06Mar2013
Copyright:   (c) Joel McCune 2013
I have customized the date output slightly, but with a slight amount of fiddling it is not hard to figure out how this works.
The pipe symbol is recognized by PyScripter as the insertion point for the cursor when the new file is created. The pipe symbol will not be there. Since the first thing I need to do when creating a new toolbox is correctly specify the name, this is where I have the cursor inserting at.
Name: |
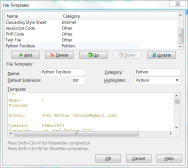
Once satisfied with the file, the next step is to add it to new file templates. First select all the text in your template and copy it. Next open the file templates dialog by going to Tools > Options > File Templates. In the bottom half of the file templates dialog, populate the necessary fields:
- Name: Python Toolbox
- Default Extension: pyt
- Category: Python
- Highlighter: Python
Next, and this is very important, click the Add button to add the new template to the list in the top half of the dialog. If you make any subsequent changes, make sure and click the Update button or your changes will not be saved. With the Python toolbox template added, it is now safe to click OK to close the dialog.
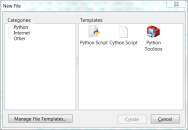
To test this handiwork, go to File > New > New File. This opens the New File dialog, where Python Toolbox will be listed as an included type.
Select Python Toolbox and click Create. A new file based on the template will be created and with syntax highlighting. Save the file and the pyt extension will be recognized.
This is it. All it takes to get PyScripter ready to work with ArcGIS Python toolboxes is ensure the pyt extension is recognized by PyScripter and create a custom new file template.
The next step is getting started coding up your first Python toolbox. Fortunately, the help documentation does a decent job of discussing this. Have fun and happy coding!


